entroducing.com
  • Home
  • Coding
  • Trading
  • Troubleshooting
    • Operating System
    • Networking
  • Reviews
  • Travel
  • Quick Snap
  • Thoughts
  • Side Hustle
  • Earn Passive Income/Referral
Website sponsored by LingeriesG
@2023 - All Right Reserved. Entroducing. Sponsored by mm3288
Codingphpsymfony

Symfony error : Call to undefined method myUser::setReferer.

by Ben December 27, 2010
written by Ben

If you have this error

Call to undefined method myUser::setReferer.

and if you are using sfGuard plugin, go to

apps\[project]\lib\myUser.class.php

and change


class myUser extends sfBasicSecurityUser
{
}

to


class myUser extends sfGuardSecurityUser
{
}

December 27, 2010 1 comment
0 FacebookTwitterPinterestEmail
Codingphpsymfony

You are not allowed to access this file. Check frontend_dev.php for more information.

by Ben October 23, 2010
written by Ben

If you had deployed to production/LIVE environment and encounter this error message when you tried to access fontend_dev.php, it is due to a security IP check in fontend_dev.php to check for 127.0.0.1 before it continue.

Thus, you need to add your public IP address in fontend_dev.php to tell symfony to let you through in the production environment. Here’s how to do it

In your fontend_dev.php file, put in the below line to print out your public ip address

echo $_SERVER['REMOTE_ADDR']. "<br/>"

Access frontend_dev.php and copy the IP address as shown.

Edit frontend_dev.php and change the line

if (!in_array(@$_SERVER['REMOTE_ADDR'], array('127.0.0.1', '::1')))

to

if (!in_array(@$_SERVER['REMOTE_ADDR'], array('127.0.0.1', '::1', '111.222.333.444')))

Where 111.222.333.444 is the IP address you copied.

Upload back the frontend_dev.php and try again

October 23, 2010 0 comment
0 FacebookTwitterPinterestEmail
Operating System

Non-Unicode program displaying Chinese characters as box/square in Windows 7

by Ben October 10, 2010
written by Ben

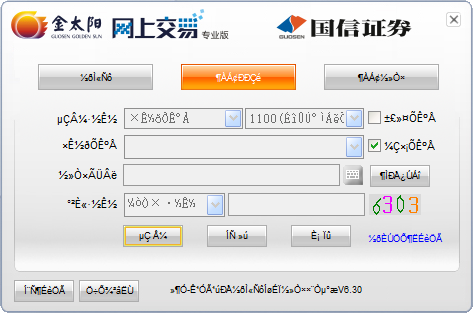
If you have a chinese/non-unicode program that is displaying funny/box/square/garbage characters in Windows 7, you may want to try this method to display it properly.

Continue Reading
October 10, 2010 1 comment
0 FacebookTwitterPinterestEmail
phpsymfony

building new app with symfony : week 1

by Ben September 30, 2010
written by Ben

Going to build a new photography website which will be maintain by my friend and myself.

Am looking at the current popular PHP frameworks which need to fufil the following requirement

  1. rapid development
  2. easy maintainance
  3. user account management
  4. file upload
  5. able to integrate easily with image manipulation library (GD lib)
  6. Suitable for a shared-hosting environment

Currently shortlisted

  1. CakePHP (which I have some experience with version 1.2)
  2. Symfony

Had do some googling and below are the pros and cons for each frameworks

CakePHP

Pro

  1. easy to code
  2. built in security access
  3. access of data via arrays

Cons

  1. Quite new as compare to Symony
  2. No (or little?) test functionality?

Symfony

Pros

  1. able to build an enterprise app (otherwise why would yahoo use it?)
  2. access of data via propel or doctrine (i.e. object oriented) as they are well supported
  3. Able to reload data easily
  4. Able to create test cases

Cons

  1. steep learning curve
  2. Complicated?

I decided to give myself a week to learn Syfmony before I decide which framework to use.

September 30, 2010 0 comment
0 FacebookTwitterPinterestEmail
Operating System

Blue screen in Windows 7 when turning on AHCI in BIOS

by Ben September 18, 2010
written by Ben

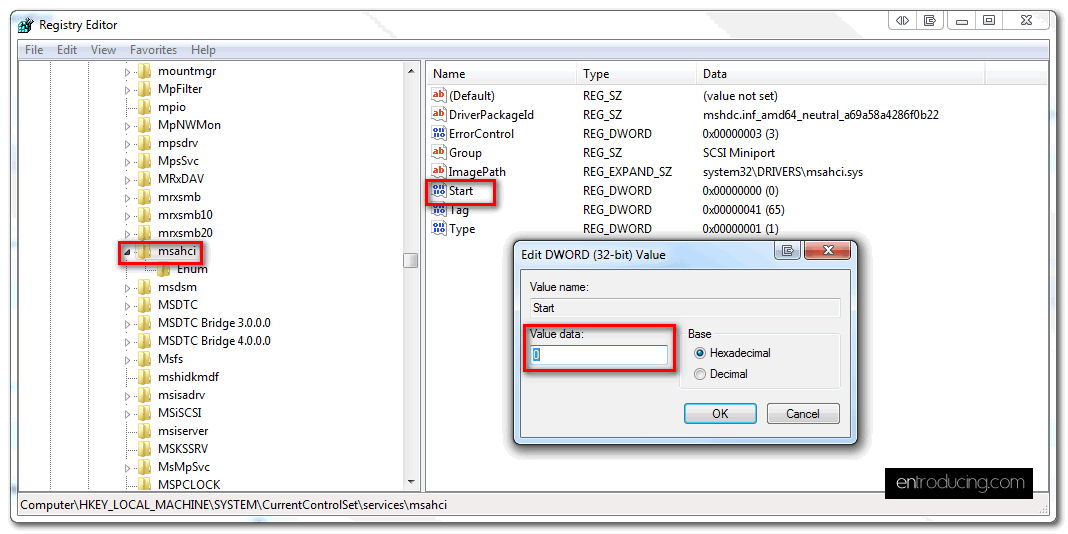
If you have blue screen when starting Windows 7 after you enable AHCI, try follow the below step to disable AHCI and force windows to reload/reinstall AHCI drivers on next boot.

  1. Disable AHCI in BIOS; turn HDD configuration to IDE
  2. Click Start, type regedit in the Search box, and then press ENTER.
  3. Locate the following registry key
  4. HKEY_LOCAL_MACHINE\System\CurrentControlSet\Services\Msahci
  5. In the right pane, right-click Start in the Name column, and then click Modify.
  6. In the Value data box, type 0, and then click OK.
  7. Reboot your computer and boot into BIOS setup
  8. Turn on AHCI in your HDD configuration

September 18, 2010 3 comments
0 FacebookTwitterPinterestEmail
Networking

extend wireless network: Part 2 – extend with linksys (DD-WRT)

by Ben August 15, 2010
written by Ben

In this 2nd part of “extend dlink 655 wireless network with linksys (DD-WRT) and engenius routers“, I will show you how to set your linksys router (DD-WRT firmware) to connect to d-link 655 router in WDS mode.

To recap, my linksys router is a repeater of my main internet router d-link655 and it is connected to a printer.

Continue Reading
August 15, 2010 2 comments
0 FacebookTwitterPinterestEmail
Operating System

How to solve yellowish tint or layer in Windows 7 Photo Viewer

by Ben August 15, 2010
written by Ben

One fine day, when I were viewing my photos in windows 7, I got shocked when I saw a yellowish tint or an overlayer that appeared on not only for one photo but all my photos!

I googled around and found out that this is a bug or issue caused by buggy/conflicting monitor profile with Windows 7.

And here’s the step-by-step procedures to solve it.

Continue Reading
August 15, 2010 2 comments
0 FacebookTwitterPinterestEmail
Networking

extend dlink 655 wireless network with linksys (DD-WRT) and engenius routers: Part 1

by Ben August 7, 2010
written by Ben

Introduction

Extending a wireless network is not an easy task.

There are various way to extend your wireless network – you can connect a cable directly from one router to another and extend from there OR you can ‘join’ 2 wireless router via wireless means.The article here will talk about the second option. The correct term for this wireless-wireless setup is Wireless Distribution System (WDS).

WDS

By definition, a Wireless Distribution System (WDS) is a system that enables the wireless interconnection of access points in a wireless network.
It allows a wireless network to be expanded using multiple access points without the need for a wired backbone to link them, as is traditionally required.

Limitation (or Requirement) of WDS

  • Some router might not support the newer WPA2 security. Note that Tomato firmware on Linksys WRT54g does not support WPA2 in WDS mode. Fortunately, DD-WRT does support.
  • Speed may decrease by 50%
  • Not all routers support WDS. I bought a Belkin N router and only realized that it doesnt support WDS wireless. Thus, do some ‘googling’ before you go and buy a wireless router.
  • A lot of patience for trial and error- if it doesn’t connect for the first time, try rebooting all the routers and try again.

My Wireless Setup

My setup is quite a challenging one as I am not only extending 1 router but 2.
Due to the location of my furniture in my living room, I have to extend 2 routers to cater for both my xbox360 and my wired network printer.

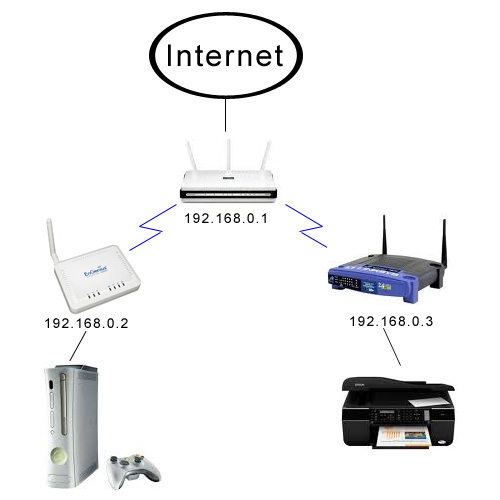
In short, my overall wireless layout is as below.

The routers that I am using for my setup are

  • D-link 655 – main router which connects to the internet modem
  • Engenius ESR6550 – A 3G cum B/G/N wireless portable router which is connected to my XBox360
  • Linksys WRT54G – an old (but reliable) G wireless router which is connected to my Epson Stylus Office TX510FN

Some basic concept/setup for WDS to work

  1. You need to manually set the ip address for each of the access points (sub-router) and the IP address must not conflict with each other. i.e. my dlink ip address is 192.168.0.1, and the rest of the router is 192.168.0.2,192.168.0.3
  2. The access point’s gateway IP should point to the main router. i.e. in my Linksys router, my IP address is 192.168.0.3 and the gateway IP is 192.168.0.1
  3. If you are using DHCP, you can set it in the main router ONLY or in each router. If you are using the latter option, the DHCP range must not conflict with the rest.
    For example, if you using only the main router for DHCP only. The main router DHCP ip address is set from 192.168.0.100 to 192.168.0.199
    if you are using DHCP for each routher, you can set 192.168.0.100 to 192.168.0.150 for router A, 192.168.0.151 to 192.168.0.199 for router B and so on
  4. Set DNS server in the access point  to your main router i.e. 192.168.0.1
  5. Wirerless SSID for all routers should be the same

My setup

  • Main router IP address is 192.168.0.1
  • Engenius router is 192.168.0.2
  • Linksys is 192.168.03
  • Subnet mask for all routers is 255.255.255.0
  • Using WPA2 AES security
  • Gateway IP and DNS are my main router IP address – 192.168.0.1
  • Wireless channel 6
  • Same wireless SSID for all 3 routers

Coming soon: WDS setup part 2

August 7, 2010 1 comment
0 FacebookTwitterPinterestEmail
  • 1
  • …
  • 5
  • 6
  • 7
  • 8
  • 9
  • 10

Search

Categories

  • Coding
    • apache
    • cakephp
    • java
    • magento
    • php
    • SQL
    • symfony
    • wordpress
  • Hosting
  • Quick Snap
  • Reviews
  • Side Hustle
  • Thoughts
  • Trading
  • Travel
  • Troubleshooting
    • Networking
    • Operating System

Tags

3.28 angry bird jb angry birds activity park apache beijing cakephp cdata cruise crypto docker elasticsearch element mall fil ftx claim hacked hanshou how-to html data in xml java johor bahru jumper land linux mac magento magento2 malacca malaysia travel move-to-earn passive income php plugin Programming rides side hustle stepn stfil stfil.io struts SyntaxHighlighter theme travel VPS windows 7 wordpress xampp
  • Email

@2023 - All Right Reserved. Entroducing. Sponsored by mm3288