entroducing.com
  • Home
  • Coding
  • Trading
  • Troubleshooting
    • Operating System
    • Networking
  • Reviews
  • Travel
  • Quick Snap
  • Thoughts
  • Side Hustle
  • Earn Passive Income/Referral
Website sponsored by LingeriesG
@2023 - All Right Reserved. Entroducing. Sponsored by mm3288
apachecakephpwordpress

cakephp and wordpress in single domain

by Ben October 27, 2009
written by Ben

If you are hosting multiple cakephp websites TOGETHER with your wordpress in one single domain, you might encountered some errors or incorrectly display css or images in your cakephp web application.

This is due to the default mod_rewrite rules  that come with cakephp installation as it is assume that the application is running for one domain name only.

Fortunately, it is possible to amend that mod_rewrite rules to allow apache to customise different routes for different applications.

Before I explain on how to do it, lets see how I configure entroducing.com

www.entroducing.com -> will call default wordpress (this blog)
www.entroducing.com/project/app1-> will run app1 cakephp
www.entroducing.com/project/app2> will run app2 cakephp

In the webroot folder of your cakephp application, edit the .htaccess file and add the following line

RewriteBase /[subdirectory]/[applicationname]

And it should looks like this

<IfModule mod_rewrite.c>
    RewriteEngine On
    RewriteBase /project/stepup
    RewriteCond %{REQUEST_FILENAME} !-d
    RewriteCond %{REQUEST_FILENAME} !-f
    RewriteRule ^(.*)$ index.php?url=$1 [QSA,L]
</IfModule>

Save the file and test your application. It should works fine now. 🙂

October 27, 2009 2 comments
0 FacebookTwitterPinterestEmail
Codingwordpress

Posting Source Code in WordPress

by Ben October 24, 2009
written by Ben

Just when I was posting source code in my previous post, I realised that my newly installed wordpress does not format the source code nicely. (Read: I’m new to Wordpress!)

Nevertheless, I google out and finally able to post source code in my blog.

Here’s how.

  1. Download Plugin: Go to SyntaxHighlighter Plugin Page and download the plugin
  2. Upload Plugin: Extract all files from the ZIP file, making sure to keep the file/folder structure intact, and then upload it to /wp-content/plugins/.
  3. Activate Plugin: Go to the admin area of your WordPress install and click on the “Plugins” menu. Click on “Activate” for the “SyntaxHighlighter” plugin.

And here’s how to use it

When creating a new post, toggle to HTML view.

If the source code you want to use is in javascript, type…

[“language”]alert(‘hello world’);[/ “language”]

in that view.  Replace the above “language” with the language of your choice. In this case, it is replaced with “javascript” (For full supported language, visit author website.)

And it should display like the below.

alert('hello world');
October 24, 2009 0 comment
0 FacebookTwitterPinterestEmail
Coding

Spry with HTML codes/CDATA in XML

by Ben October 24, 2009
written by Ben

I was assigned with a mini project to do a team notice board that read XML files using Spry.
While reading plain text in the XML is straightforward,  reading of HTML codes like <br> tag, <b> tag are not.

<?xml version="1.0" encoding="utf-8"?>
<posts>
	<post>
		<msg>This is a <strong>message</strong></msg>
	</post>
</posts>
<msg>This is a <strong>message</strong></msg>

When you type these tags(e.g. strong tag as above) in the XML, it simply ‘breaks’ the XML formatting and would thus caused an error when it is loaded with Spry

So… to input HTML data in XML…

1. Use CDATA wrapper in your XML

		<msg>
			<![CDATA[
			This is a <strong>message</strong>
			]]>
		</msg>

2. Set setColumnType(“msg”, “html”) to your Spry dataset for that field

var ds1 = new Spry.Data.XMLDataSet("data.xml", "posts/post");
ds1.setColumnType("msg", "html");

Spry with HTML Data Source Code

Spry with HTML Data Online Demo

October 24, 2009 0 comment
0 FacebookTwitterPinterestEmail
Networking

Wake-On-Lan with Dlink DIR 655 over the internet

by Ben September 24, 2009
written by Ben

Wake-on-lan allow a computer to turn on automatically over the network by sending some magic packet. See wiki.

There are some requirements in order to turn on WOL. In brief, they are

  1. On a wired LAN (read: ethernet card ans not those WIFI card)
  2. Turn on WOL feature in BIOS and windows driver
  3. A compatible router that can forward/send magic packet (WOL information) to network

For more details, you may want to check out on lifehacker.

I think you can find most of the general information on WOL on the internet but setting up WOL with Dlink DIR 655 isnt that straighforward.

Unlike a tomato firmware where you can login to the router admin page and click on a button to wake it up, there is no specific tool or page available in DIR655. Thus, you would need to go to some online website such as Depicius , type in the information and send the magic packet to your router ip address.

One common mistake with most users is that they thought the magic packet must be send to the target machine ip address to wake up. Unfortunately, this isnt the case with WOL. In WOL concept, a magic packet must be broadcast to a subnet  by specifying an ip address ended with .255 . i.e. 192.168.0.255 or 10.0.0.255. Upon sending this packet over the network, network card which belongs to this subnet will then pick up the magic packet and retrieve the mac address from it. If the mac address belongs to itself, it will boot the machine up.

And here’s how to setup WOL in Dlink

1. Login to your router Admin Page (e.g. 192.168.0.1)

2. Go to ‘Advanced’ tab

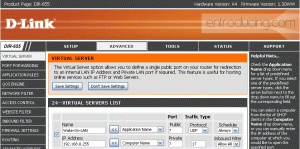
3. Under ‘Virtual Server’, tick one of the checkbox and type in the below information

Name: <Any name>

IP Address : <your subnet ending with .255> In my case it is 192.168.0.255

Port (Public and Private) : 7

Protocol : UDP

Schedule: Always

Inbound Filter : Allow All

Dlink 655 WOL setup
Dlink 655 WOL setup

4. Save the setting, reboot the router, off your machine

5. Go to Depicius http://www.depicus.com/wake-on-lan/woli.aspx

6. Type in your IP address, Mac address, Subnet(i.e. 255.255.255.255) and Port number (i.e. 7) and click wake on lan button

7. Your machine should boot up!

September 24, 2009 7 comments
0 FacebookTwitterPinterestEmail
Thoughts

finally got this website up

by Ben September 19, 2009
written by Ben

Had registered this domain name in the late 2005 and been putting up a ‘under construction’ page for 5 years!

Finally got a chance to sit down and install wordpress in it.

Had search for some themes today and eventually decided on this sharpfolio theme from webrevolutionary.

Check out some of the other nice themes below I have found today.

FREEmium

screenshot

screenshot

September 19, 2009 0 comment
0 FacebookTwitterPinterestEmail
  • 1
  • …
  • 8
  • 9
  • 10

Search

Categories

  • Coding
    • apache
    • cakephp
    • java
    • magento
    • php
    • SQL
    • symfony
    • wordpress
  • Hosting
  • Quick Snap
  • Reviews
  • Side Hustle
  • Thoughts
  • Trading
  • Travel
  • Troubleshooting
    • Networking
    • Operating System

Tags

3.28 angry bird jb angry birds activity park apache beijing cakephp cdata cruise crypto docker elasticsearch element mall fil ftx claim hacked hanshou how-to html data in xml java johor bahru jumper land linux mac magento magento2 malacca malaysia travel move-to-earn passive income php plugin Programming rides side hustle stepn stfil stfil.io struts SyntaxHighlighter theme travel VPS windows 7 wordpress xampp
  • Email

@2023 - All Right Reserved. Entroducing. Sponsored by mm3288